
| Ok I admit I put this marquee theatre sign up here only because it's One Direction. :P <3 >.< |
There are many, many codes for a marquee. I'll just talk about two here.
Code Type One
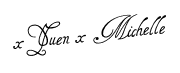
Here's the most basic, one-line code for a marquee:
<marquee behavior="scroll" direction="left">This is a marquee! xYuenx </marquee>
It will look like this:
To change the speed, add this scrollamount="1" after "left" and before the closing tag > .
1 is for slow speed, 10 for medium, and 20 for fast.
To make the marquee go to the left then stop right at the edge, put "slide" instead of "scroll". To make it bounce from left to right and vice versa, replace "scroll" with "alternate"
To make the marquee go up instead of left, change "left" to "up".
To add a background colour, put a bgcolor="yellow" before the > closing tag.
Code Type Two
This code is what I'm using for my blog. It's not a single-line code like the above, it's much longer. So for those of you very, very new to html, it might scare you. But, this code offers more changes and control of how you want your marquee to look like than the one above.
Here's the code:
Here's where you can change your marquee:
- Font color: Pick the font colour you like best. Here I'm using red. If you don't know what code is your favourite colour, click HERE to find out the code.
- <marquee onmouseover="this.stop()" onmouseout="this.start()" This part tells you that when you hover over your marquee, it will stop in its track and let you read it.
- Scrollamount: This is like in Code Type 1. It lets you change the speed.
- Bgcolor: Like in Code Type 1, you can change the background colour. Here I put white because my background is white, so it will look as if it has no background at all.
- <b> is a BOLD tag. Obviously you can also add italics, underline with their own tags, <i> and <u> respectively.
- Font size: Change your font size here. If you want really big text, you can change to a bigger number.
- Font face: This is the font style. You can change the fonts here. In the above example, I use three fonts. That doesn't mean it will display the text in three different fonts at once. Actually, the fonts come in a first come first serve basis. For example, there are Cambria, Calibri and Verdana here. Not all computers have Cambria font. If it does have it, it will display it, but if it doesn't, it will move on to Calibri, and if still not, then the font displayed will be Verdana. You can add more fonts as backups, but usually it's just three. The last one should be something simple that everyone has on their computers.
- Then, replace YOUR TEXT HERE with the text you want to use.
- Finally remember to close off everything.
You're done! Paste the marquee code in a blank HTML/Javascript gadget by going to Layout > Add A Gadget > HTML/Javascript > Paste code in content box > Save.
As usual, do not put a title. Place your marquee wherever you want it to be, for me I put it above the blog posts so it'll always show up there. :)
Easy, right? Happy html-ing! Cheers!
Thank you for your support :)
ReplyDelete